Saturday 24 December 2011

Tom Cat


Merry Christmas to you all.
I just want to say a big thank you to everyone who has checked out my blog, it means a lot to me and I hope you  get some inspiration from the things I have made.
Merry Christmas and a happy New Year to you all.
Look out for some more posts in the New Year.

Friday 23 December 2011

Gift Box

This is a lovely box to put odd shape presents in, it is made from a sheet of A4 cardstock, folded then decorated, this is made the same way as the mini tree decs. I used papers I had left from last Christmas.
The flower is made from two 5 petaled flowers which I have curled the petals upwards then added smaller punched flowers for the centre with a gem in the very centre. The leaves are oak leaves that I also punched out.
To make the box score a line down the centre of the long side of the A4 card. Next find the centre of the two short sides then score outwards to the edge of the card,to the first line you made, crease well, fold the sides in, then punch holes on the side to thread ribbon through, when the ribbon is tied it holds the box together.

Thursday 22 December 2011

All in one Gift Box

I love making boxes.
These gift boxes are made from one sheet of A4 card which are then decorated. The box is another good way to use up any left over papers.
 The papers I used for the box below are ones I had left over from making a Christmas organiser.


The look of the box can be changed by how it is decorated. I chose to use plain card but it could have been embossed. These boxes also look good when the edges have been inked with distress inks.
The finished box measures about 16cm x 8cm, they are good for any awkward shaped present that needs wrapping.

Wednesday 21 December 2011

2011 Christmas Cards

 Here are the cards I have made and sent this year. The back two cards are also ones I have done as a class at the Craft Buddies Crop at Tithe Barn. I have used different techniques; stamping, paper piecing and folding, as well as using peel-offs. I have added glitter, gems and sequins too.
I did not set out to make all Christmas tree cards, they just evolved, I do like the Christmas pudding one though, Karen first showed me this one several years ago, I like to make it for some of the children I work with.

Tuesday 20 December 2011

Christmas Card

I must start by apologising for the quality of the photos,
I think my camera has been dropped so I will get it looked at over the holidays.
These dinky little cards are 3"x3",the stamp I used came from http://www.craftbuddiespapercrafts.co.uk/
 The tree is embossed using an old gold colour embossing powder.
The card is finished by adding gems or glitter to a corner (or where any glue dried where it shouldn't have been.)
I used Bazzill card to stamp onto, I love the feel of this card. The card in the centre of this last pic is 4"x4" and the stamped image has been mounted onto a torn red square then onto mirri board.
These cards are very quick to make, they are an easy to make in batches, which is good as I made about 40 of this design.

Monday 19 December 2011

Gift Tag Holder

I saw a picture of a gift tag holder, this is my take on it. The actual holder has three parts to slide the tags into, so you can store at least 20 tags in it. The paper I chose to use was a freebie from one of the craft mags and it matches some paper that I got from my local store.
The holder is kept closed by a matching slider, I have tidied the edges by using peel-offs, this also adds a bit of bling too.


Sunday 18 December 2011

Christmas Place Settings

These are the place settings I made for last year, but they are so cute I wanted to share them. Karen and I were discussing a class and these are what I came up with. The robbin is made from two circles, one then cut to form the robbin's body, with a gem for an eye and bendy hearts for a wing. I then made a matching serviette holder, Karen made one with a cream strip of card running down the centre, this made the holder stronger.
The diamond shaped place setting is a miniture spring card, This came about because I like to keep small samples of cards I have made in the past. These are also good as wedding place settings.

Friday 16 December 2011

After Eight Box

This delightful little box holds five After Eight chocolates, just the right amount for a chocolate fix!!
To make the box I started by measuring the size of an After Eight, then eating it, then I decided how many chocs I wanted the box to hold, ate a few more then made the box.
I have covered my box using Basic Gray paper, I know the paper is old stock but I love it.
The stamp I used is from Stampin up.
You can see from the picture that the flap slides behind the raised stamped scalloped oval to stay closed.
I managed to make several of these little boxes but only one ended up with After Eights in, I'm now looking for BOGOF's at the shops, and I wonder why my clothes are getting tighter!!

Thursday 15 December 2011

Tree Decorations

I have just realised that I have not posted on my blog for over two weeks, I am very sorry but hope the next few posts make up for it.
I made 24 of thse mini triangle boxes to hang on my christmas tree but I think they look better on this tree, which my friends Ann and Ellie bought me for christmas two years ago.
 The christmas puddings are made from one brown circle and a pearlesent (? sorry my spelling is really bad at the mo.) cream semi circle for the custard. The holly are sequins that I purchased from my local supermarket.
 I tied the boxes together with red ribbon then threaded gold thread through for the hanger, this is when I also added the bell, I wanted to buy the papermania ones I had seen but when I went looking everywhere had sold out so I bought hobbycraft own make and I must say I am very impressed with them, I got more for less!!
If you wanted to make these into advent boxes you could add the numbers onto the reverse of the box.

Tuesday 29 November 2011

Birthday Card

This card is one I made for my Dad's birthday.
I stamped the image onto linen card, I really like the effect it gives. I've then inked around the edges and added colour to the middle of the image.
Glossy accents have been added to highlight parts of the stamped image.
I hand cut the top-note shape then embossed it using cuttlebugs swiss dots, faux stitching was then added.
The 'just for you' was stamped using embossing ink then heat embossed with gold.After I put the card together I used walnut stain DI to go around the edges of the card base.
When I stood the card up it lacked something, this was when I decideded to add the three gems in two of the corners.

Friday 25 November 2011

Key Card

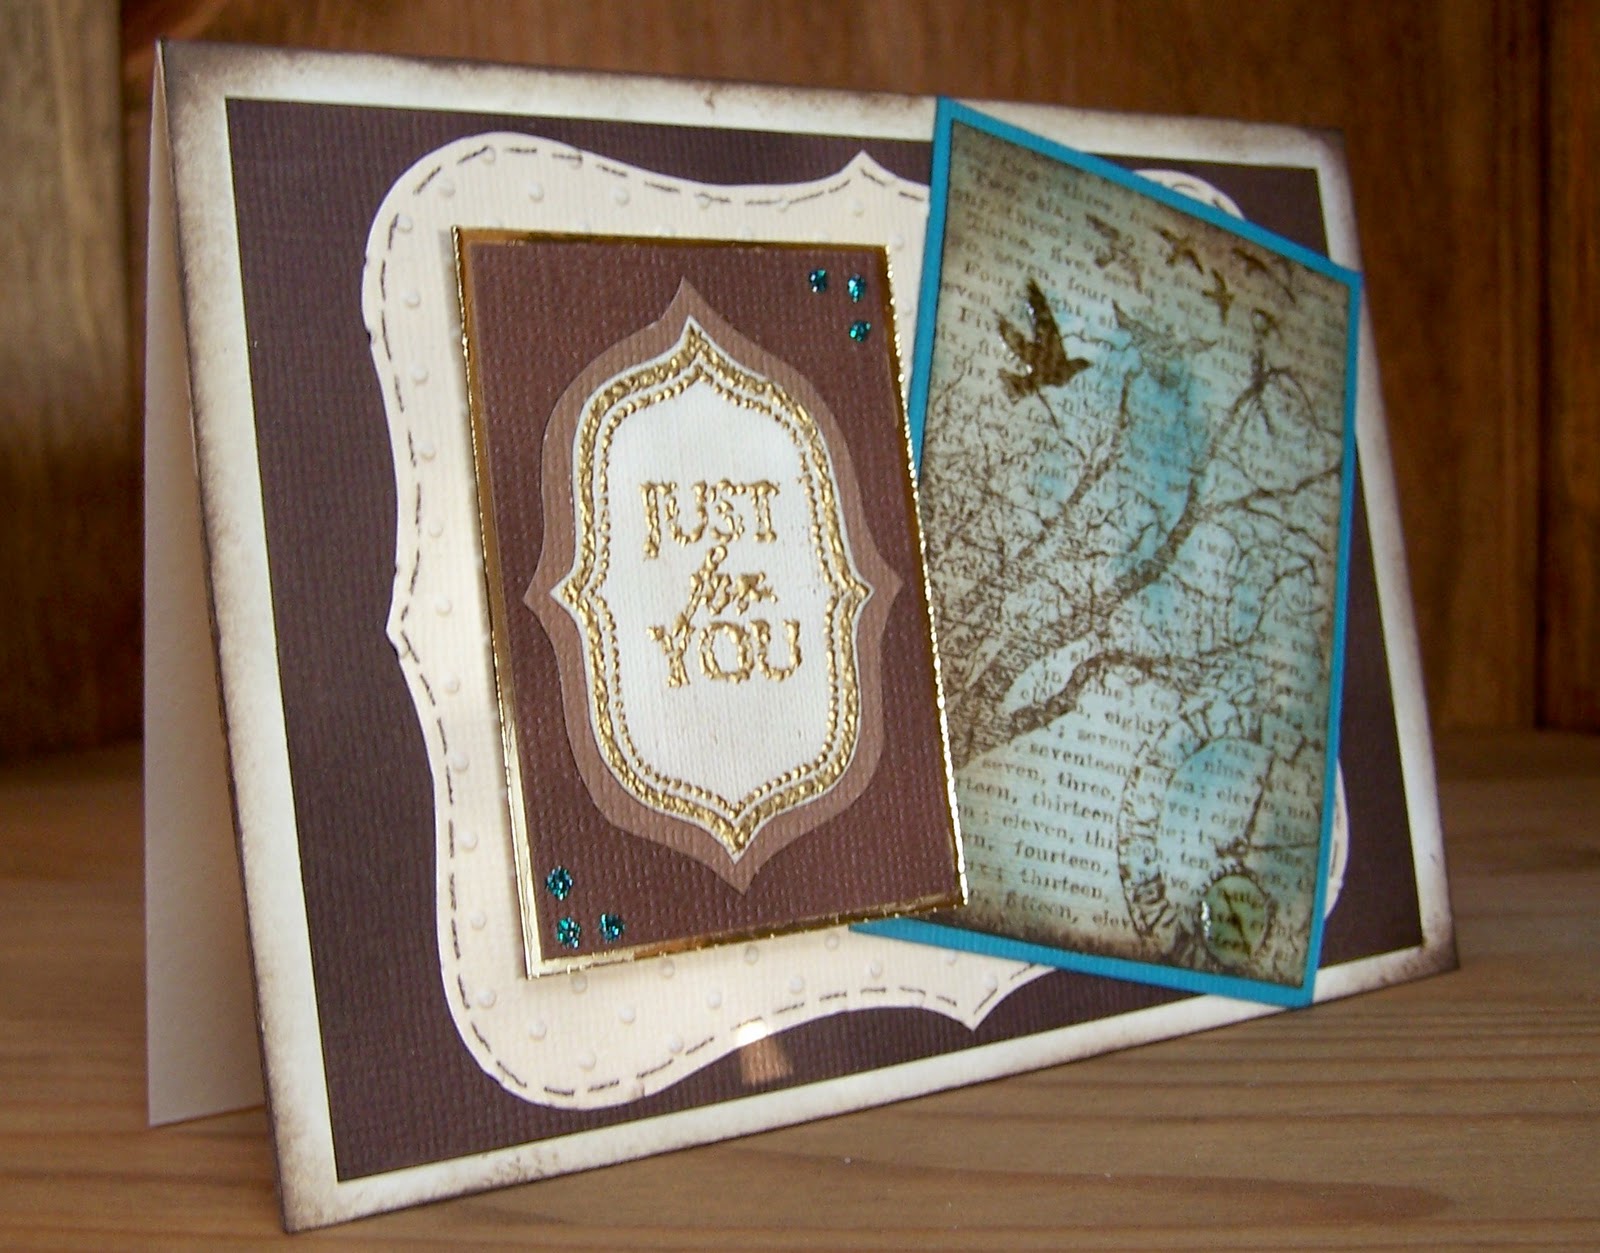
I am so pleased at how this card turned out,
It has 'real' stitching on it, not the usual faux stitching I normally add, distress inks, glossy accents, glitter and a punched edge.
I bought the stamp from Karen at 'Craftbuddies' as I love keys, it was only £1.99 and worth every penny.
I started by stamping the image onto linen cardstock as I wanted an aged feel to the actual card.
I then inked up the card and put it to one side to dry.
This is when ,while waiting for it to dry (I didn't even think to use my heat gun) that I decided to add real stitching to the card.
AfterI matted the card front onto red card, I wrapped some of the thread around the bottom of the card, then attached it to the stitched panel.
I layered two punched edges, offset, to the right hand side of a card base. Next I attached the card front to the card base.
The finishing touch was to add glossy accents and glitter to the stamped keys, I used Stickles rock candy.
As it was Karen's birthday I  added the vellum happy birthday.
Next time I make this card and I will, I plan to add a key from a Primark necklace which was full of keys for only £4.

Monday 21 November 2011

Friend Card

 I love how this card looks and the friend who it was for still has it out.
The stamps are from 'Stampin up', the inks are DI, shabby shutters and spiced marmalade all layered onto Bazzill swiss dots cardstock.
I finished the card by adding faux stitching and inking around the card base.
The 'F' for friends is a mix of the two inks used, one of those happy mistakes that I make so often.
I love the way the flower looks and stands out on the card.
This is the ideal card just to let someone know they are special.


Thursday 17 November 2011

Easel Thank You Card

 This card is the class from September at Tithe Barn, some of our ladies wanted to know how to make a triple easel card so I had a play around and this is the result.
The purple paper is glittered and looks amazing in the correct light, not in a photo taken at night with all the lights on!
The small butterflies are punched from my Martha Stewart punch, the larger ones are cut from the Tim Holtz butterfly movers and shakers die. The card base is a DL card that I have divided into three.
The 'thank you' stamp is one I have had for an eternity and use so often I'm surprised it continues to stamp sharpe images each time I use it.

Monday 7 November 2011

Christmas Card

This is the class on Saturday 12th November at Tithe Barn, Horsford. The cost will be £2.00. We will be using alcohol inks, peel offs and glitter.

If you wish to take part in the class, please let Karen know over at Craft Buddies. Tools needed are; craft mat, cutting tool, glue or strong tape, also if you have a mat that you ink on and a Tim Holtz wooden handle thingy for the alcohol inks that would be helpful. I will provide the glitter, alcohol inks and everything else needed to complete this card. 

Monday 31 October 2011

Polo Shirt Card

I really wanted to make a polo shirt style card which I thought might be suitable for a teenager, I was not happy with my first effort, the brown shirt, as it does look too much like an every day shirt, so I tried again and was slightly happier with the green polo shirt attempt. However I will try to make it slightly different if I make it again.
For this card I used coredinations card and my happy birthday embossing folder.
 I think the green shirt is better as I have added detail that looks more polo shirtish, yes this is a new word, I did keep asking son number two, Adam, to stand in front of me with his best polo shirt on so I could try to get it right. He did offer really constructive advice too, such as adding the detail to the cuffs etc.
So next time I am going to make the 'V' not as deep and make the collar squarer.
All things considered I now think it is a pretty good first attempt, apparently though It would be greatly improved  if I bought Adam a new polo shirt that he could model for me.

Thursday 27 October 2011

Advent Calendar

While making the previous advent calendars I wondered what one would look like as a chest of drawers,so I finally found time to make one.
I have used my favourite papers again, Basic Grey, along with cream card and chipboard.
I started by making the matchboxes which I then attached together using pva glue, this meant I was able to line the boxes up a little bit easier as I had a small amount of time in which I could slide the boxes about. I made four columns of six boxes which I then attached together to form the chest of drawers affect.
Next I used chipboard to make a box to house the matchboxes in, this gives the whole advent calendar a sturdier finish, I also used  chipboard to make a top and base for the housing to sit on.
I covered all the chipboard pieces with patterned paper before attaching together. 
Finally I finished the advent calendar by adding the numbers, I chose to do a random pattern for this, I decorated every other box front with faux stitching and then added the brads and rick- rack as drawer openers.
I decided to add glitter to the patterened paper but this does not show in the picture. 
 Again as with the other advents I have made all it needs now is little gifts in each drawer.

Sunday 23 October 2011

Matchbox Box

Here is the cordinating matchbox mini tower that goes with the matchbox box I made back in September.
It stands just over 2.5" high and is just under1.5" wide.
Again I used my score board to make the boxes.
I have added glitter to the paper and glossy accents.
Here they both are on my work top, they would make a lovely gift for anyone who has tiny things to store; brads,buttons or jewellery.
This picture shows where I am using the matchboxes to store my bits and bobs in,maybe I could fill the whole unit with these little storage towers.

Wednesday 19 October 2011

Birthday Book

This Birthday Book is based on the Special Dates book I have made previously, however this one does not hold cards, it is to act as a date reminder.
The papers I have used are from Cosmo Cricket, the Snorkel range. I finished the book by adding glossy accents to both the front and back cover.
 I printed the months onto card then matted the months onto matching coloured card. the book is put together using a bind it all.
The actual book is just bigger than A6, it would fit in a handbag or like mine my tray at work so I can keep track of when it is my colleagues birthdays.

Saturday 15 October 2011

Daddy's Girl

At last I have completed a layout!!
I have used pictures of my hubby, Chris and daughter,Lucy, she really is a Daddy's girl and can wrap him around her finger so easily.
Karen designed this layout for our last months workshop at Taverham, isn't it fab.
The 'lace' around the circle is paper folded into box fold pleats, very fiddly, but extremely effective.
I finished the layout by adding pearls and gems around the circle, this helped to tie in the hedge colour. Well, I thought I had finished the layout but have just realised I have not added the date to it, I knew it was too good to be true!!!!!

Tuesday 11 October 2011

Note Books

These note books are another order I was asked to make, the lady wanted them as mini gifts for Christmas, but they are also a good way to use up scraps of paper and card.
 Each note book is about 12cm tall, so they are ideal to fit in pockets or handbags. Plus if the recievers are anything like me lists are the order of the day as I get older.


Friday 7 October 2011

Advent Calendar

These delicious Advent Boxes are the reason I have not blogged for a while. I was asked to make these two advent boxes for a friends' children, they look fantastic, even if I do say so myself, but take ages to make. I used Basic Grey papers, my absolute favourite, along with co-ordinating brads, bazzill card, rick rack, glossy accents and stickles.
Each tower has 24 match boxes, obviously, so as I was making two Advents I had to make 48 match boxes. I could score the boxes on my Martha Stewart score board but the wrapper had to be measured in cm, so it was not as straight forward as it might have been.
Once all the boxes were made I attached them together three high using wet glue, then glued them together the same as I made the Matchbox Box. 
I made a top and base  from covered chipboard and used copious amounts of glue to make sure they stayed in place.
To finish the Advents, I stamped numbers on co-ordinating paper and punched out with a mini circle punch. To make it easier for myself I pushed the brads through the rick rack pieces before adding it as handles, it was like having a production line in my craft area.
To complete each drawer I found the middle, put the brad through, then added faux stitching to every other drawer before attaching the numbered circle.
Finally to finish the Advent I used my glossy accents and stickles to highlight areas of the paper.
All they need now is a gift in each drawer.

Monday 3 October 2011

Christmas Tree Card

This effective black, silver and white card is the class at the CraftBuddies Crop, Tithe Barn, Horsford this Saturday 9th October.
If you would like a place contact Karen at http://www.craftbuddiespapercrafts.co.uk/ 

Friday 9 September 2011

Matchbox Box

I just love little boxes that hold all odds and ends that I do not know where to put. Last year I made an advent tower/box out of matchboxes that I had made, but I did not have a score board so I drew up a template to use and hand cut 24 boxes and covers and scored using a ruler and embossing tool, it took what felt like forever.
I have seen these matchbox kits on the internet for a long while and have always wanted to make one but have been too stingy to buy the kit, so my summer holiday challenge to myself was to make a matchbox using my Martha Stewart scoreboard. I know I could probably have done a web search to find instructions but I am not that good on a computer plus broadband is pretty pants in the area I live in, the connection keeps breaking up. 
I am pleased to say that once I had the pattern sorted in my head it was fairly easy to do. I have even managed to do the measurements so that each side is scored the same.
 But as yet I haven't been able to work out the cover in inches only in centimetres, so I mark where the score lines should be then line up the card on the MS board and do it that way.
This box is just the right size to keep four different sets of brads in, or Lucy could keep some of  her jewellery in it. Now I know I can make these  boxes easily I can make lots of storage towers, or mini desks, or sets of drawers. Then I can buy more brads to go in them!!  

Monday 5 September 2011

Special Date Book

This book is like a birthday book but it holds all the extra dates you need as well, like anniversary's. I first saw this book  in  papercraft inspirations about two years ago and thought it looked amazing as well as extremely useful.
I made my book big enough to hold A6 cards but the book can be made to hold any size card. I decided to use book rings to hold my pages together but it could easily be made using the bind-it-all. I have now made four of these books for close friends.

To make this book:
I used chipboard
 book rings
 plain card stock
 patterned paper
 ribbon
 punches cricut to cut the top note shape
 The tabs are made from my 'stampin up' tab punch to which I have added a tiny oblong of white card to write the month on. I have also made 3 wallets to inside the book by cutting down A5 plastic wallets, these can hold slightly bigger cards than the pockets allow.
 As you can see I have put the printed out months on the left hand side and on the right hand side the patterned paper is the pocket for cards to be stored in. All I need to do now is fill the book with cards ready  for everyone's birthday.
I finished  the outside of the book by tying various types of ribbon around the book rings.

The lovely thing about making these books is that you can use any paper and card, it can be from a set or  paper that you would not necessarily use on a layout. If the card stock is not heavy enough you could glue or stitch two pieces together. 
Karen is making one of these books too, hers is bigger, it will hold A5 cards and she has matched the paper to the months, so for February the paper reflects valentines, for September the paper reflects the start of autumn.