Monday 24 December 2012

Snowmen Tealights

 
I first saw these on inkingidaho.blogspot.com made by a really talented lady called Becky Roberts.
I thought they would be ideal to use as place settings for Christmas day.
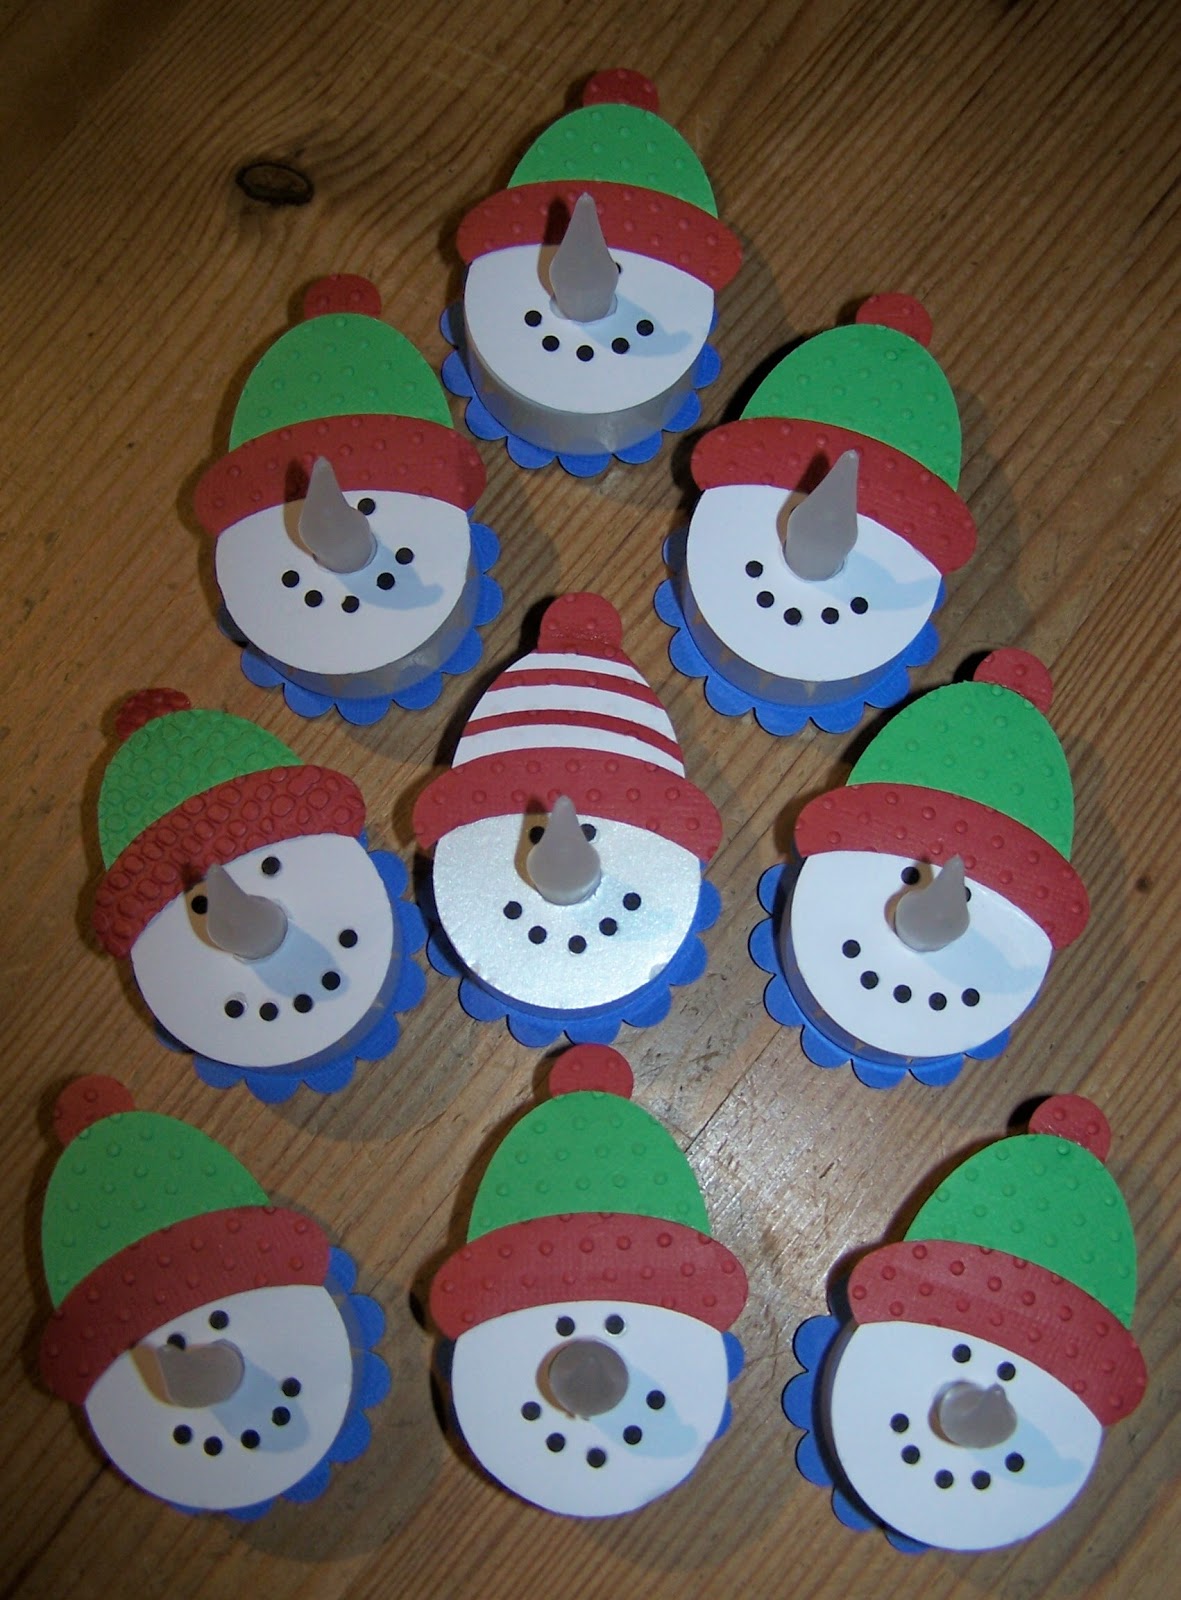
The one in  the middle is for my father in law, we think it looks a bit like a Where's Wally snowman, but actually his hat is red and white as father in law supports Arsenal FC


I also made a box, just because I wanted to see how the snowmen looked boxed up, I think they look so cute!!!
 

The tea lights I used were from two different places, I bought some from 'Roy's', a shop in the town where I live, four for £2.00 and some from the 99p stores in Norwich that also came in a pack of four.
Both work well but the flames/noses are different sizes so please be aware if you are going to make some.
 
Merry Christmas.

Sunday 23 December 2012

Christmas Decoration

I made this star decoration for the teacher I work with, she loves pink!!!
I used a stampin up pink and DI shabby shutters.
The gauze is a matching green but it does not show up to well in the photo.
 
When I made this decoration I cut all the shapes first then inked up the stamp and took the paper shape to the stamp rather than the other way around, I do not have a stamping my jig which would have made the whole process quicker but my way worked just fine.
The center is a button that Lucy had.
 
Merry Christmas...

Thursday 20 December 2012

Christmas Candle

Here is a picture of a candle I decorated that was part of the class held at Sylvia's in the summer. I had not done this before but was very impressed with the final effect.
I bought two more candles to decorate but as yet have not had enough time to do them, oh well there is always next year!!!!!!!!!!!!!!!

Monday 17 December 2012

Christmas Card

This Christmas card was made to go with a hamper of goodies all made in Norfolk that is a gift going to Cumbria, I also made a tag to match.
 I made the background using my alcohol inks, left it to dry then spritzed with blue glimmer mist, once that was dry I stamped the tree using black soot DI.
I printed the words from the computer and then punched out the shape, I attached this to my card witth foam pads then added the gems.This is then matted onto silver mirri card and a matching blue card before being put on the card front.

Saturday 15 December 2012

Christmas Wreath

I love this wreath, I have made it for Christmas but the die I used is not a Christmas one.
To make the wreath I used Tim Holtz Autumn Leaves long die, I cut about 60 leaves in different shades of green.On the die are also the twigs, I cut six twigs which I then cut down further to add in between the leaves.
The base of the wreath is the Tim Holtz weathered clock die cut from chipboard twice then layered up with the clock cut in green.
To put the wreath together I tied the red ribbon around the clock, then attached the leaves using wet glue. I divided the clock into quarters and filled in a quarter at a time. I shaped the leaves as I went along using my bone folder. Next I added the twigs which I also shaped. To finish the wreath of I added the yellow flowers with glitter in the middle of them. If I had added red flowers they would have looked like berries.
Hpoe you like it.

Wednesday 12 December 2012

Gift Boxes


I was recently asked to make some boxes to hold ear rings as a christmas gift. I used my cricut to cut these mini tree boxes, they measure about 2" high. I added glitter and glossy accents to the scalloped paper which I used to give the impression of branches on the tree. 
 I find that Bazzill card works best in my cricut, anything else seams to tear and rip.
I put a strip of red tape along the closing edge so that once the gift was in the box it could be sealed until christmas day!!!

Friday 7 December 2012

Cristmas Decoration

 
At the end of the summer I went to  a Stampin up day at Sylvia's crafty conservatory, she showed us how to make these fab decorations. On the day we made them in traditional red and green using SU inks.
I made this modern one for a good friend to hang in her craft room which she has recently decorated. I think she liked it. I used distress inks to stamp with and added glitter which cannot be seen in the picture.
 Sylvia gave us each a copy of the instructions but I'm sure they can be found through a google search.
I also made a box for the decoration to be stored in, I used 8" x 8" card and scored it on all four sides at 1 1/4", then cut and glued to make a box top.
The base was made in the same way but I started with card that measured 7 7/8" x 7 7/8" then scored the four sides at 1 1/4". As it was a gift I decorated the box too.


Tuesday 4 December 2012

Christmas Card

 
This card is one that I did as a class at Craftbuddies last crop. They look very elegant like this but the look can be changed just by using coredination card and distressing the embossed snowflakes.
We made it in lilac but it looks great with the pale blue.
The tree is made by using mirri board and a memory box die. The die cuts so fine and so well that it looks like a peel off.
The snowflake at the bottom of the tree is from  a Tim Holtz mini die, which I have then embossed.
The sentiment is stamped in silver.
 As you can see I had a run on making these as well.


Saturday 1 December 2012

Father Christmas Card


This happy looking card is a copy of one I found while searching the Internet for inspiration, I would love to give credit to it's creator but all I could find was a picture of the card.
I drew myself a template on chipboard so I could easily make lots of cards.
As you can see I have made a few of these, I think they are so cute and Father Christmas looks extremely jolly!!
After experimenting with inks and things to add definition to his cheeks, I decided to use my chalks which have not seen the light of day for many years now!!
These cards also look good with googly eyes.

Thursday 29 November 2012

Advent Calendar

 
I've made this Adent Calendar to take into the class where I work, my own children either do not want a calendar, Jake age 19 but I do want a Christmas stocking Mum, or they want a shop bought one, Lucy and Adam!!!
The instructions for this are on the internet, I googled Advent calendars, it is very cleverly put together using a card grid and a Stampin up punch. The number squares are also from Stampin up. 
 
 I used a mixture of distress inks and stampin up inks to stamp the images.
The box handles are made from cross stich threads.
The chocolates inside the the little boxes are Hershy Kisses, at the moment they cost £3.00 for two packets at Asda, there are 30 chocolates in each packet.
This project is really easy to put together, the hardest part is cutting the card to size.

Monday 22 October 2012

Birthday Card

This is the Birthday Card I made for my Mum.
I used three techniques to make it, stamping, embossing and punches.
To start with I embossed white card with the cuttlebug swiss dots folder, next I used stampin' ups mini embossing folder for the oval centre, which I then cut out by hand. To finish the centre I stamped 'especially for you' and used stampin' ups large oval to punch it out.
The flowers are from a stamp set I use a lot, if you look back on my blog you can find other things I have embellished using the vintage vogue stamp set. I stamped the leaves directly onto the embossed white card. I then stamped the leaves and flowers onto scrap white card and cut them out, I used pink DI and touched the edge of the stamps with a brown DI.
To put the card together I matted the white card onto pink then attached it to a card blank.
The sentiment and flowers were attached using foam pads. To finish the card I put the ribbon on the left hand side and  pearls in the flower centres


Hope you like the card, my Mum did.

Sunday 14 October 2012

Bat time.


After spending the week looking I have at last found my piece of paper with the web address for the original Bat template that gave me the idea for the class.
The instructions and other idea's appear in a magazine called Woman's Day Specials, if you google womanaday.com/special it should come up.
I hope you have as much fun as I did making the bat.
We plan to hang them up on our beam in the living room.

Sunday 7 October 2012

Halloween Bat

This is the class for Craftbuddies crop on 13th Oct at Tithe Barn, I wanted to do something for Halloween that could be a card or a gift.
The original idea came from a magazine site in Australia, I have written the web address down and put it somewhere very safe so I can credit the original maker, but at the moment somewhere safe is too safe!!!
As soon as I find it I will post the address here.
 
All bats hang upside down!!!
But watch out you don't lose the chocolate bar!!!


Here he is the right way up.


Sunday 30 September 2012

Thank You Cards

I wanted to share the Thank You cards I made and sent to my family after our suprise party.
I love dragonflies and as they were on our anniversary cake it seemed fitting to have them on the Thank You cards too.
 I stamped the flourishes first in silver, then the 'thank you', I found it best to leave the cards over night  to let the ink set and dry.
Next I used 'indigo blu's' flitter glue to ink up my dragonfly stamp, I stamped 10 cards at a time before adding indigo blu mega flakes to the stamped image and rubbing the excess off and polishing the image. The flakes I used are called Yorkshire Dale.
.
I then matted this onto silver mirri board and attached to  a card. Finally I added gems and stickles to the card this also covered up any odd bits of ink on the black card.

Wednesday 26 September 2012

Chocolate Pencils

The children have now been back at school for three weeks, so I thought I would show you these pencils I made during the holidays using Rolo's and Hershy's Kisses, I saw the idea on a blog called 'inking idaho'.

 I cut yellow card the length of a pack of Rolo's and wide enough to go round with a spare bit for the double sided tape, then I scored long ways every 1/4 inch. I put red tape along the spare bit of card and wrapped the whole thing around the Rolo's. the 'rubber' is made with pink and silver card just wrapped around the top of the pencil and attached with red tape.
The pencil point is the Hershy's Kiss, stuck on with a glue dot, at the time I made these Asda had lots of American sweets on offer, so it worked out that I paid £1.50 for a pack of about 25 Kisses. Apparently the 99p Stores sometimes have the Kisses but not when I looked!!!
As you can also see I made a pencil from a tube of smarties as well, but I think the Rolo's work best.
Next time I make some of these I might add black lines down the pencils, just like the ones we have in our school.

Friday 21 September 2012

Cup Cake Cards

I like to make use of all my scrap card and paper so sometimes have a splurge on making cards just from these scraps.
These cup cakes are both good for the waist and the purse!!!!!!
I have put mine onto 3"x3" cards but they are fantastic toppers for bigger cards or gift tags.
A sentiment can be added later.

The stickles glitter adds dimension to the cup cakes, dimension can also be added by using foam tape to layer up the toppings, but unfortunately if the finished cup cake is too thick it will cost more to post.

Sunday 16 September 2012

Congratulations Card

My closest, I'm not allowed to say oldest, but she is, friend recently got engaged. She rang me one evening to tell me then came round for coffee the next morning so I did not have long to make the happy couple a card.
I used my big shot and the stampin up die to make the card base, it's easier than it looks, just google it.
I used colours that I know my friend loves.
When I had put the card together it looked bare on the front, that was when I decided to stamp flourishes all over, the effect made the card look quite different.
Also I knew I had some teeny tiny alphabet stickers somewhere but could I find them when I wanted them, so I stamped the letters then cut them into the size etc that I wanted.
My friend loved the card.
The stickers magically turned up just after she left, exactly where they should have been but weren't

Monday 10 September 2012

25th Wedding Anniversary.

 
This layout shows photos from our 25th Wedding Anniversary.
I used green and peach colours as when we got married Chris wore his Army uniform and my bridesmaids were in peach.
The title on the layout '25 years together' are cut from one of the napkins from our surprise party.
 The dragonfly in the top corner was part of the decoration on our anniversary cake and the two pins in the rosette flower were used to hold ribbon on the cake, they were the same colour as my wedding dress!!!I punched small silver flowers to put with the rosette flower to echo the silver flowers on the cake. I love the way this all works to make a lovely layout of a fantastic day.
 

Wednesday 5 September 2012

I started this layout at the stamper's 10 I go to, so the stamps and coloured card are all Stampin Up, the layout was originally 8x8 but I wanted it to be 12x12 so attached it to black card stock once I got home.
The layout is of Lucy looking very much the young lady she is, her Dad dislikes this picture as it makes her look a lot older than she is and he doesn't want his beautiful little girl all grown up.


Saturday 1 September 2012

Bird House

Lots of people have made bird house boxes this is my take on it.
The top is hinged and inside are matching cards, gift tags and  note book. Originally I was going to put in a piece of acetate and fill the box with bird seed for my mum, she is always feeding the bird's in her garden.
 The paper I chose to use is old stock Basic Grey but I chose it because it had a circle on the design which I used for the opening on the front of the bird house. All my measurements to make the bird box had to be drawn around this, fiddly but so worth it.
 I made the pattern up for the bird house as I went along, I think it worked out well.

Thursday 30 August 2012

Peppa Pig

This is the card I made for lucy when she turned 13, she has gone from liking One Direction to loving Pepper Pig, what a girl!!
The back ground paper is Basic Grey (what else) and Pepper Pig is made from Bazzill cardstock.
I went round the edge of all the card stock with matching pro markers, I had to add a flower gem to Pepper Pig's dress as I managed to get a glue slpodge.
I just love the googly eyes they make Pepper Pig follow you around the room.

Sunday 26 August 2012

16th Birthday Card

Adam was 16 earlier this month so I wanted to make a special card for him. He loved it and it is still standing up in our living room.
I used my favourite Basic Grey papers, distress inks, stamps and charms all held together with ribbon.
 The first picture is  the first picture ever taken of Adam, He was born looking really red so he lived up to his name we had chosen.
 Family is very important to Adam so I had to include this one of him with Lucy and Jake.
I cannot believe he is 16, time really does fly!!!!!


Wednesday 15 August 2012

Angry Birds

I made these cards for Jake when it was his birthday. Unfortunately he saw them when I was making them, my fault, I called him because I wanted to ask him something and I forgot to hide what I was making.
The inking around the edges really bring the birds to life, if thats possible for cartoon birds!!
 I had to make two cards because I knew his brother would forget to get him a card, he is so disorganised!!
I first saw the idea for these cards on Valita's designs & fesh folds. I think they look very effective

Monday 13 August 2012

Together


This layout is of my Grandparents, I wanted to keep it simple but elegant, my Grandma was a very elegant lady. I choose to use a black background which may look a little harsh but the flowers and lace soften the harshness.
The words are rub ons that I have had for ever, I have put hidden journaling in a pocket under the picture.
I think I like the end result, it is very Grandma.

Friday 10 August 2012

Picnic Basket

As it is summer and we have had some good weather, I thought I would make another picnic basket, this is made the same way as I made the Easter basket this Easter.
 I think the pink highlights on the flowers and swirls go beautifully with the green gingham. I made the rose using a six petal flower cut out three times and rolled and glued in place, I like making these but somtimes I think they do end up looking like squashed roses but not this time.
 When I thought I had finished the basket it still looked like it needed something so a butterfly came to the rescue yet again.

Tuesday 7 August 2012

Stampin Up

These are the cards I made when I went to Sylvia's first Stampin Up workshop in her crafty conservatory. Luckily for us Sylvia has recently retired from boring old work and will now be selling stampin Up.
 I did discover that I am not very good at following instructions, apparently that is no surprise to the people who I work with, I have no idea what they mean!!!!!!!
My favourite card to make that day is the turquoise card below.
 As soon as I saw what I call the fairy dress card I knew I would be sending it to my sister Alice for her birthday. Who would have thought that both these cards use the same stamp set!
I had a great day, thanks Sylvia.